Step into the world of Roomstyler 3D, where interior design becomes simple, creative, and fun. This powerful online tool lets you design floor plans, decorate with real products, and create lifelike 3D renderings of your dream space—all from your computer. Whether you’re a beginner experimenting with layouts or a professional working on client projects, Roomstyler 3D gives you the freedom to design with confidence.
Introduction to Roomstyler 3D
Roomstyler 3D is an easy-to-use design platform that helps users create and visualize spaces virtually. With its drag-and-drop interface, vast product library, and realistic 3D rendering, it’s a go-to tool for anyone interested in home design.
Key Features
-
Extensive library of furniture, decor, and materials to choose from.
-
Drag-and-drop tools for simple and fast room planning.
-
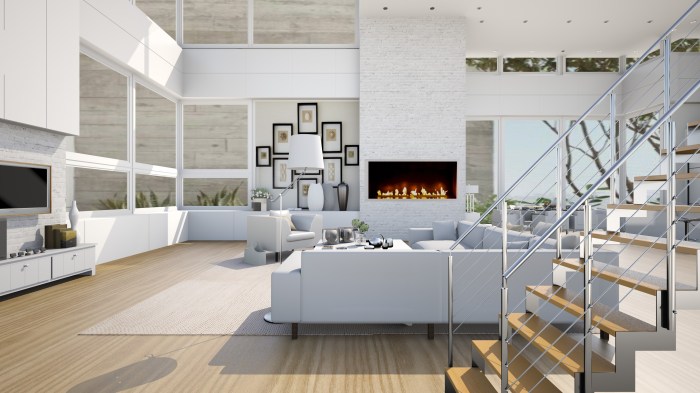
Realistic 3D renders that show your space as it would look in real life.
-
Interactive design process to adjust layouts, colors, and lighting in real time.
-
Sharing & collaboration features to work with others or get feedback.
Getting Started with Roomstyler 3D
Creating an Account
-
Visit the Roomstyler website.
-
Click Sign Up and enter your details.
-
Confirm your account to start designing.
Navigating the Interface
-
The dashboard shows featured designs and projects.
-
The top menu gives access to Design tools, the Community, and Trends.
-
Profile settings can be updated via the top-right menu.
Starting a Project
-
Select Design > Start a New Project.
-
Choose a template or begin with an empty room.
-
Add furniture, decor, and fixtures using drag-and-drop.
Designing with Roomstyler 3D
Roomstyler 3D comes with tools that make designing easy and enjoyable.
Essential Tools
-
Draw Room – Build custom floor plans by sketching walls.
-
Furnish – Add furniture, accessories, and decor.
-
Paint – Change wall colors and textures.
-
Lighting – Adjust brightness, shadows, and ambiance.
Floor Plan Tips
-
Use the gridlines for accurate measurements.
-
Add doors and windows early for a realistic layout.
-
Experiment with room shapes to explore options.
Adding Furniture & Decor
-
Browse the library for furniture and accessories.
-
Drag, drop, rotate, and resize items to fit your vision.
-
Layer with rugs, artwork, and lighting to complete the look.
Customization & Rendering
Roomstyler 3D goes beyond basics by letting you customize every detail.
-
Colors & Materials: Apply wood, marble, fabric, or metal textures.
-
Lighting: Test natural daylight, ambient glows, or spotlights.
-
Rendering: Generate high-quality, photorealistic images for portfolios, client presentations, or sharing online.
Collaboration & Sharing
Designing is better when shared—and Roomstyler 3D makes it simple.
-
Collaborate in real time by inviting friends or colleagues.
-
Share designs via social media, links, or within the Roomstyler community.
-
Get feedback by publishing your designs for others to comment on.
Final Thoughts
Roomstyler 3D is more than a design tool—it’s a creative platform that helps you bring ideas to life. With its user-friendly interface, customization options, and collaborative features, it’s perfect for both personal projects and professional use. Start exploring today, and see how easily you can transform your design ideas into stunning visuals.
FAQs
Q: Can I collaborate with others on Roomstyler 3D?
Yes, you can invite others to join your project and work on it together in real time.
Q: How do I share my designs?
Projects can be shared on social media, via direct links, or published in the Roomstyler community.
Q: How can I get feedback on my designs?
Post your projects in the community forum to receive tips, suggestions, and encouragement from other designers.